Tag Archives: Notes

Changing the playback speed of Youtube videos

I generally like to watch lot of conference videos and lectures in youtube. Most of the time these videos are long (> 1 hour) and sometimes the speakers speak slowly. I wanted to see if there is a way by which I can increase the playback speed of the videos.

Luckily I stumbled upon the HTML5 experiment page of Youtube, which allow you to control the playback speed.

So, if you are interested in controlling the playback speed of youtube videos, then just go to youtube html5 experiment page and enable it. You should also be using one of the latest browsers for this feature to work. I think youtube is saving this setting per browser and not per user account.

Once you enable the experiment, there will be a small settings icon in your video player which will allow you to vary the playback speed.
Varying youtube playback speed
Hope this small tip is useful for you 🙂

Posted in Google/Yahoo | Tagged , , | 5 Comments

Dissecting my wedding program

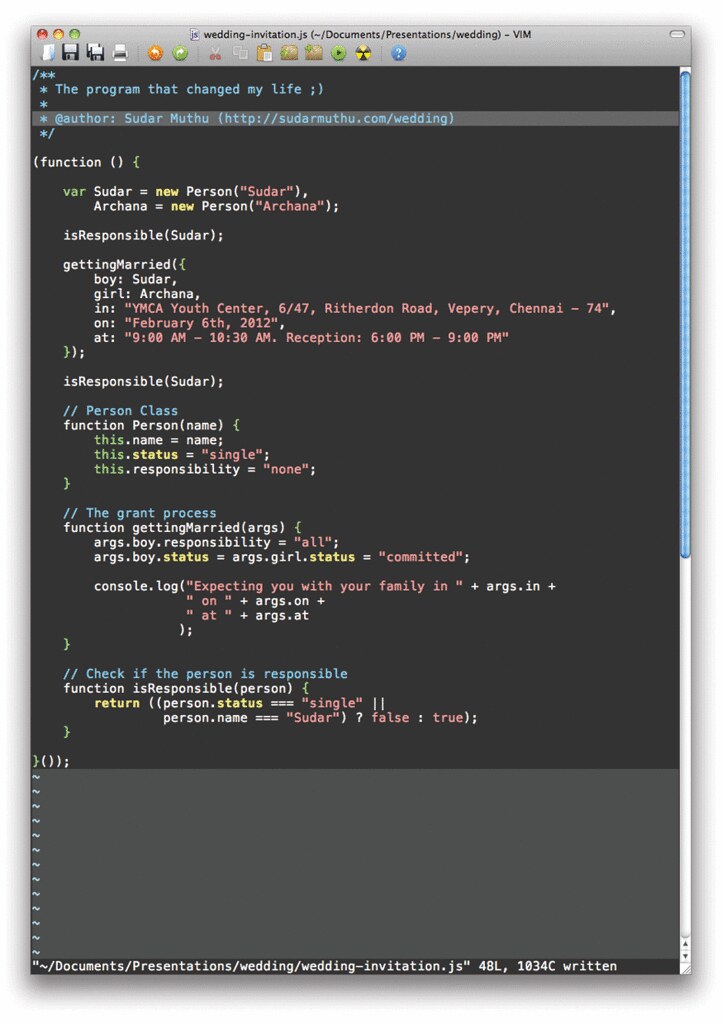
A couple of people to whom I gave my wedding card, were not able to fully understand the program that I wrote in it and have asked me to explain it. Now that I have kind of settled a bit after my wedding, I thought of dissecting the program and explain it.

Code

Let’s have a look at the code one more time.

My marriage Invitation

You can also get the code from github.

Language

To start of the program was written in JavaScript. Whoever feels that JavaScript is not a *real* programming language, should first read these articles by Douglas Crockford.

Anonymous Function

The program starts with an anonymous function. This is not strictly needed by JavaScript syntax, but it is always considered a good practise to do and I generally do it in all JavaScript code that I write.

Object variables

Next, I create two instances of the Person object. This is similar to creating objects in any object oriented programming language.

Information about wedding

As you might have guessed, gettingMarried function is that one which prints the information about the marriage. I am passing a JSON object to the function as an argument with the required information.

Checking the responsibility

This is the main crux of the invitation. I am verifying the responsibility before the marriage and after the marriage.

If you look closely at the isResponsible function, you will note that it has a special condition, which will always return false for me, irrespective of my marital status. The hidden message is that, I will never change after marriage. It’s going to be month since I am married and I can say that I haven’t changed yet. Hoping that it continues for the rest of my life 😉

Posted in Random/Personal | Tagged , , | 3 Comments

Developing Android Apps – Part 2 – Week one – My notes

This week, I was not able to attend the full class due to time constraint, since I returned from a vacation on Tuesday. So my notes will not be as detailed as it used to be. I will try to provide detailed notes next week.

Getting authenticated with oAuth

So basically this week, Tony explained how to setup oAuth authentication, so that we can use the Twitter API without explicitly asking for password from the users.

In order to set it up, we have to first register for an app from Twitter. You can follow the screencast at the end of last week’s notes to do that.

Twitter4J

The next step is to include the Twitter4J jar. You can download it from the project homepage and then you have to copy it to the /lib directory of your android project. If you are using windows, then you can follow the steps given in this forum post to add Twitter4J to your android project.

Source code

You can access the source code for this week’s class from the official github repository.

See you all next week with detailed notes 🙂

Posted in Android/Java | Tagged , , | 5 Comments

Developing Android Apps – Part 2 – Overview – My notes

As I mentioned before, Creative tech is conducting part 2 of the Developing Android App class. Like Part 1, I am planning to post my notes here so that it would be helpful for others too.

Introduction

This week, we had the Overview session by Tony (the presenter). The training started off with a brief explanation of the concepts that were covered in Part 1. Tony then explained briefly about Twitter and the explained what are the things that will be covered in the next 5 classes.

The following is the schedule for the next 5 weeks.

Week one

  • Getting Authenticated with Twitter
  • oAuth
  • Twitter4J
  • Webview and webview Client

Week two

  • Advanced ListView
  • List headers and footers
  • Concurrent Programming with Threads
  • Handlers

Week Three

  • Tweeting from App
  • Creating menus
  • Using AsynTask to run many Concurrent tasks
  • Posting tweets

Week Four

  • Adding style to the App
  • Themes
  • Styles
  • Selectors and XML Graphics
  • Designing for multiple screen dimensions

Week Five

  • Posting photos from the app
  • Getting photos from the library
  • Getting photos from the Camera
  • Posting photos with twitpic4J

Homework

The homework for this week is to register an application and get authentication keys to use oAuth with Twitter. This has to be done before the next week class so that you can use to try next week’s code.

Tony has created the following screencast which explains the process of registering your application with Twitter.

There are lot of really interesting things lined up and I am very excited about this course. See you next week 🙂

You can also subscribe to my blog’s RSS feed or follow me in Twitter to receive updates about my notes for the next sessions.

Posted in Android/Java | Tagged , , | 9 Comments

Developing Android applications in Java – Session 3 – My notes

This week in the Android course, Tony taught about the storing and retrieving information from database. Android has a bundled SQLite database and your app can store and retrieve information by creating a new database. The database that is created by an application is available only to that application and no other application can access it.

SQLiteOpenHelper

Android SDK provides a class called SQLiteOpenHelper which can be used for interfacing with this SQLite database that is associated with your application.

SQLiteOpenHelper has two methods which can be used for creating/updating the database. They are the following.

onCreate

The onCreate() method gets called when the app gets installed for the first time. The SQL code to create the database should go in this method. In addition to the SQL code we should also specify a version number for the database which will be used subsequently during upgrades.

onUpgrade

The onUpgrade() method gets called when the app is upgraded or if the version number specified in the app is greater than the one which is present in the database. Typically this function contains Alter table SQL code which will be used to upgrade the database.

In addition to the above two methods, the SQLiteOpenHelper also has other methods which can be used to access the database. One such method is getWritableDatabase()

getWritableDatabase

The getWritableDatabase() method will return a SQLiteDatabase object which has reference to the database. You can read more about this method from android documentation.

In addition to these methods, the SQLiteOpenHelper class other methods but the above there are the notable ones. You can read more about the SQLiteOpenHelper class from the android documentation.

Selecting data from the database

To selected data from the database, we have to call the query() method on the SQLiteDatabase object which is returned by the getWritableDatabase() method above.

The query() method returns an object of type Cursor, which can be iterated over to retrieve the resultset. The following code snippet explains the query() method.

private void loadTasks() {
	currentTasks = new ArrayList<Task>();
	Cursor tasksCursor = database.query(TASKS_TABLE,
			new String[] {TASK_ID, TASK_NAME, TASK_COMPLETE},
			null, null, null, null, String.format("%s,%s", TASK_COMPLETE, TASK_NAME));

	tasksCursor.moveToFirst();
	Task t;
	if (! tasksCursor.isAfterLast()) {
		do {
			int id = tasksCursor.getInt(0);
			String name = tasksCursor.getString(1);
			String boolValue = tasksCursor.getString(2);
			boolean complete = Boolean.parseBoolean(boolValue);
			t = new Task(name);
			t.setId(id);
			t.setComplete(complete);
			currentTasks.add(t);
		} while(tasksCursor.moveToNext());
	}
}

Inserting data into the database

In order to insert the data into the database we have to call the insert() method of the SQLiteDatabase. The data that needs to be inserted should be added to a ContextValues object and then passed to the insert() method. The ContextValues object is like a HashMap which contains the key and the value for each column of the row that will be inserted.

The insert() method returns the id of the row that was inserted. The following code snippet explains the insert() method.

public void addTask(Task t) {
	ContentValues values = new ContentValues();
	values.put(TASK_NAME, t.getName());
	values.put(TASK_COMPLETE, Boolean.toString(t.isComplete()));

	t.setId(database.insert(TASKS_TABLE, null, values));
	currentTasks.add(t);
}

Updating data in the database

To update data in the database we have to call the update() method of the SQLiteDatabase object. Like the insert() method, the data that needs to be updated should be passed in a ContextValues object.

The following code snippet explains the update() method.

public void saveTask(Task t) {

	ContentValues values = new ContentValues();
	values.put(TASK_NAME, t.getName());
	values.put(TASK_COMPLETE, Boolean.toString(t.isComplete()));

	long id = t.getId();
	String where = String.format("%s = %d", TASK_ID, id);
	database.update(TASKS_TABLE, values, where, null);
}

Deleting data from the database

To delete data from the database we have to call (guess what 😉 ) the delete() method of the SQLiteDatabase objet. The delete() method takes the where condition based on which the rows will be deleted.

public void deleteTasks(Long[] ids) {
	StringBuffer idList = new StringBuffer();
	for (int i =0; i< ids.length; i++) {
		idList.append(ids[i]);
		if (i < ids.length -1 ) {
			idList.append(",");
		}
	}

	String where = String.format("%s in (%s)", TASK_ID, idList);
	database.delete(TASKS_TABLE, where, null);
}

You can read more about this method from android documentation.

Demo App Sourcecode

The demo TaskManager app that we have been using in the previous classes was modified to store the tasks in the database. You can find the source code from my github page. I am also working in this week’s homework and will be posting the explanation and source code once I am done.

You can also subscribe to my blog’s RSS feed or follow me in Twitter to receive updates about my notes for the next sessions.

Posted in Android/Java | Tagged , , , , | 7 Comments

Using ArrayAdapter and ListView in Android Applications

This week’s homework in the android class was to create a simple ListView using ArrayAdapter instead of generic ListAdapter.

ArrayAdapter

ArrayAdapter is a special kind of ListAdapter which supplies data to ListView. You can refer to my notes for last week to know about ListView and ListAdapter. You can also read about ArrayAdapter in android documentation.

Adding views

First create an empty android project. Then edit the main.xml layout file to add a ListView. Then create another layout xml file which will contain the TextView (or any component) that will be displayed within the ListView.

Editing Activity

The next step is to change the generated activity class to extend from ListActivity. This is very important because only a ListActivity will be able to display the ListView.

Binding the adapter

The next step is to bind the ArrayAdapter to the ListActivity. We can do this by calling the setListAdapter() method.

To this method we have to pass an object of type ArrayAdapter. You can pass an object reference to this method or we can even create a new anonymous method like below.

We have to override the getView() method of the ArrayAdapter class to create the TextView (or any other component) which will be created for each list.

Finishing up

So that’s it, you are done. 🙂 All you have to do now is to save the project and run it in the emulator. If everything is done properly, then you can see the list of items displayed in the ListView like below.

android-listview

Source code

I have uploaded the entire project source code into github and you download it from there and verify it with your code.

Try to complete the homework, before the next session and do come back to view the notes and the homework for the next session too. 🙂

You can also subscribe to my blog’s RSS feed or follow me in Twitter to receive updates about my notes for the next sessions.

Posted in Android/Java | Tagged , , | 34 Comments

Developing Android applications in Java – Session 2 – My notes

Like last week, I attended the session on Developing Android applications in Java by Creative Techs and O’Reilly and here are my notes which I took during the session.

Replace TextView with ListView

In this week’s session, the demo app that was created last week was modified to use the ListView element instead of TextView.

The ListView provides a nice UI for displaying the list of tasks together with a checkbox to indicate whether they were complete or not.

Screenshot

You can see the new UI of the application in the following screenshots.

android-listview

ListView and ListAdapter

ListView is a control which can be used for creating list of scrollable items. The data to the ListView will be provided by ListAdapter.

You can think of ListView as the “view” component in a MVC framework and ListAdapter as the “model”

The class which is going to act as the ListAdapater should implement following methods

  • getCount()
  • getItem()
  • getItemId()
  • getView()

You can read more about ListView and ListAdapter from android documentation.

Adding ListView

To add ListView to any activity, we have to include the <ListView /> tag to the activity’s layout xml. In our sample app, the ListView tag is added to the main.xml file.

The Activity class that uses ListView should implement the ListActivity instead of plain Activity class. In our sample app, the ViewTasksActivity class is derived from the ListActivity class.

Magic ids

Android SDK provides some predefined ids which can be used some specific purposes. One such “magic id” is android:empty.

We can assign this to any element that we want to be displayed when the ListView is empty.

Homework

This week’s homework is to Build a simpler (but less flexible) way to load data into a list using an ArrayAdapter (instead of a BaseAdapter). I would be completing the homework and would be posting the explanation and the source code later this week. So stay tuned 🙂

Source code

I have uploaded source code for yesterday’s session in github and you can download it from there. I am also working in this week’s homework and will be posting the explanation and source code once I am done.

You can also subscribe to my blog’s RSS feed or follow me in Twitter to receive updates about my notes for the next sessions.

Posted in Android/Java | Tagged , , | 8 Comments

Using preference API in Android applications

This week’s homework in the android class was to persist the task information in the sample TaskManager application across program runs, which was created during the class.

Preference API

Android provides a preference API, using which we can store task information. The preference API is very simple to use and all we have to do is to get the instance to the preference object from the Application object and then call the getString() and putString() method.

Serializing ArrayList to string

The only tricky part of the home work is that, since the preference API supports only storing and retrieving of strings, we have to serialize and de-serialize the ArrayList object which has the list of tasks into string.

Instead of writing my own code to do this conversion, I used the code from the Apache Pig project. You can check out the class from the pig’s github page.

Storing the task

In the addTask() method of the TaskManagerApplication class, we have to get the instance of the shared preference and then store the serialized ArrayList using the putString() method.

	public void addTask(Task t) {
		assert(null != t);
		if (null == currentTasks) {
			currentTasks = new ArrayList<task>();
		}
		currentTasks.add(t);

		//save the task list to preference
		SharedPreferences prefs = getSharedPreferences(SHARED_PREFS_FILE, Context.MODE_PRIVATE);
		Editor editor = prefs.edit();
		try {
			editor.putString(TASKS, ObjectSerializer.serialize(currentTasks));
		} catch (IOException e) {
			e.printStackTrace();
		}
		editor.commit();
	}

Retrieving the task

Similarly we have to retrieve the list of tasks from the preference in the onCreate() method

	public void onCreate() {
		super.onCreate();
		if (null == currentTasks) {
			currentTasks = new ArrayList<task>();
		}

		//		load tasks from preference
		SharedPreferences prefs = getSharedPreferences(SHARED_PREFS_FILE, Context.MODE_PRIVATE);

		try {
			currentTasks = (ArrayList<task>) ObjectSerializer.deserialize(prefs.getString(TASKS, ObjectSerializer.serialize(new ArrayList<task>())));
		} catch (IOException e) {
			e.printStackTrace();
		} catch (ClassNotFoundException e) {
			e.printStackTrace();
		}
	}

Finishing up

So that’s it, you are done. 🙂 All you have to do now is to save the project and run it in the emulator. If everything is done properly, the tasks that you enter will be saved even after you restart the app.

Source code

I have uploaded the entire project source code into github and you download it from there and verify it with your code.

Try to complete the homework, before the next session and do come back to view the notes and the homework for the next session too. 🙂

You can also subscribe to my blog’s RSS feed or follow me in Twitter to receive updates about my notes for the next sessions.

Posted in Android/Java | Tagged , , | 7 Comments

Developing Android applications in Java – Session 1 – My Notes

Like last week, I attended the session on Developing Android applications in Java by Creative Techs and O’Reilly and here are my notes which I took during the session.

Demo Application

In this week’s session, he created a sample task manager app which can be used for maintaining list of things to track. This app was created using Android 1.6 with Google API support. You can download the source code of this demo app below.

The sample app will have two activities. One will have a simple data entry form which can be used to add tasks and the other to view tasks which were entered. Check the screenshots below to see how the sample app looks like.

android-taskmanager-1 android-taskmanager-2

Layouts

Tony (the instructor) briefly explained about the different types of layouts and for the sample apps he used Relative Layout. You can read more about the relative layout from the android documentation.

The major pain point in using Relative layout is that, the controls should be specified in the order in which they are referenced and not in the order in which they will be displayed.

EditText control

EditText control is an editable control which can be used to get user input. It is similar to the HTML textbox or the Java Swing JTextField.

You can read more about EditText control from android documentation.

Sharing data between views

An application can have multiple activities (views) and to share data between these multiple activities, the android framework provides a class called Application. This Application class can be accessed from all the activities of the app by calling the getApplication() of the Activity class. Tony explained this about this class and also used it in the demo app to store and retrieve tasks from multiple activities.

You can find this class in the TaskManagerApplication.java in the sample app. You can download the source code of this demo app below.

Safe cancelling

Tony also explained about how to listen to text changes and make sure the user is not moving away from the activity when there are unsaved work.android-taskmanager-3

You can check the cancel() method in AddTaskActivity class, where we will be showing an alert box (see screenshot) using the built in AlertDialog, whenever the user clicks the cancel button without saving the task that he has entered.

You can read about the AlertDialog class in the android documentation.

Source code

I have uploaded source code for yesterday’s session in github and you can download it from there. I am also working in this week’s homework and will be posting the explanation and source code once I am done.

You can also subscribe to my blog’s RSS feed or follow me in Twitter to receive updates about my notes for the next sessions.

Posted in Android/Java | Tagged , , | 16 Comments

Android application that triggers the phone dial screen

As you know, I am following the free course on Developing Android applications in Java by CreativeTech and O’Reilly (even you should, if you are interested in developing apps for android) and this week’s homework in the course is to create an app which will show the phone dial screen when a button is clicked.

I just finished it and I thought of posting the source code and explanation so that it will be useful for others too.

Creating the project

The first step is to create the android project. You should follow the instructions given in the android documentation. You would need Eclipse and the android SDK to be installed to do this.

You will have an empty project to start with and with the default project structure, which I explained in my previous post.

Adding the button to the view

If you have followed the first session then you know that adding a button to the view is quite easy. All you have to do is to open your view file (/res/layout/main.xml) and add the following code.

<Button
    android:id="@+id/dialer_button"
    android:layout_width="fill_parent"
    android:layout_height="wrap_content"
    android:text="@string/dialer"
/>

You should also declare the value for the @string/dialer key in your values (/res/values/strings.xml) file by adding the following line

<string name="dialer">Phone Dialer</string>

Adding the button to the activity

After adding the button to the view, we have to declare the button in the activity. To do so, we have to add the following line in the Activity file.

Button dialerButton = (Button)findViewById(R.id.dialer_button);

Bind the Listener to the button

After creating the button instance in the activity, we have to bind a click listener to it. In the click listener we have to invoke the Phone dialer intent. Add the following code to the activity

dialerButton.setOnClickListener(new OnClickListener() {
	@Override
	public void onClick(View v) {
		//open the phone dialer on clicking the button
		Intent intent = new Intent(Intent.ACTION_DIAL);
		startActivity(intent);
	}
});

In the above snippet the following line does the trick

Intent intent = new Intent(Intent.ACTION_DIAL);

It creates the intent, which will open the phone dialer.

Finishing up

So that’s it, you are done 🙂 All you have to do now is to save the project and run it in the emulator. If everything is done properly, you will see the following screen in the emulator.

android-homework-1  android-homework-2

When you click the button, it should open the phone dialer.

Source code

I have uploaded the entire project source code into github and you download it from there and verify it with your code.

Try to complete the homework, before the next session and do come back to view the notes and the homework for the next session too. 🙂

You can also subscribe to my blog’s RSS feed or follow me in Twitter to receive updates about my notes for the next sessions.

Posted in Android/Java | Tagged , , | 7 Comments