I love to integrate devices which are not supposed to be integrated and this guide shows you how you can control an Android mobile using Apple’s Remote. (Who said Apple devices work only with Apple products 😉 )
Basic Architecture
This is the basic architecture of how we will be setting up different pieces so that they can talk to each other.
Apple Remote -> IR Receiver -> Arduino -> Bluetooth Shield -> Amarino -> Android
What do you need
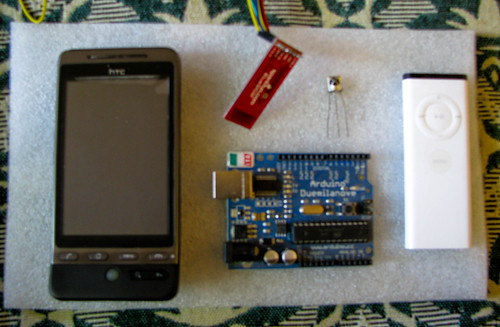
Components needed
- Arduino Board (Either Uno or Duemilanove)
- Arduino Bluetooth Shield
- IR Receiver
- Apple Remote
- Android Phone
Libraries used
Programming Skills
- Basic Arduino programming
- Basic Android programming skill (Optional)
Arduino
Arduino – Connecting the IR Receiver
The first step is to connect the IR Receiver to Arduino. The IR Receiver has three legs (Vcc, Gnd and signal).
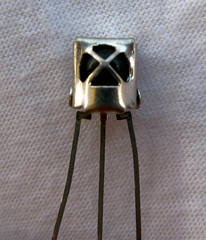
- Connect the Vcc pin of IR Receiver to Arduino’s Vcc pin
- Connect Gnd pin of IR Receiver to Gnd pin in Arduino
- Connect the signal pin of IR Receiver to Arduino digital pin 11
Arduino – Code
The next step is to write the code in Arduino called as sketch. The code should do the following
- Read the signal from IR Receiver
- Identify the button that was pressed
- Send the button code using Bluetooth
Arduino – Libraries
In order to do the above steps, we will be using the following two libraries.
IR Remote
This library allows us to identify which button was pressed by reading the signal from IR Receiver. Download the library from its home page and copy it to your Arduino library folder.
Amarino
This library allows us to connect Arduino and Android using Bluetooth. Download the library from its home page and copy it to your Arduino library folder.
Create a new Arduino sketch and copy the below code. You can also download the code from the github page .
After creating the Arduino sketch compile and upload it to your board. Once it is uploaded you should disconnect the USB to serial cable which connects the Arduino to the computer.
Arduino – Connecting Bluetooth shield
The next setup is to connect the Bluetooth shield to Arduino.
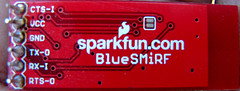
Please note that before you connect the Bluetooth you should disconnect the computer USB to Arduino cable, otherwise it will not work.
The Bluetooth shield has 6 pins and it should be connected like how it is explained below.
- Connect the Vcc Pin of Bluetooth shield to Arduino’s Vcc pin
- Connect the Gnd Pin of Bluetooth shield to Arduino’s Gnd
- Connect the Rx (Receiver) pin of Bluetooth shield to Tx (Transmitter) pin of Arduino.
- Connect the Tx (Transmitter) pin of Bluetooth shield to Rx (Receiver) pin of Arduino.
- Short the CTS -1 and RTS -0 Pin of Bluetooth shield.
Android
Install Amarino app
The first step is to install the Amarino app in your Android phone. You can download the Amarino app apk file from its homepage .
Create the control app
The next step is to create the Android app that will listen for the events from Amarino and control the music player. You can create a new Android project in Eclipse and copy the code. Please note that you should add the Amarino library jar file to the project’s class path.
The entire source code for the Android app can be downloaded from the project’s github page .After creating the app install it on your phone.
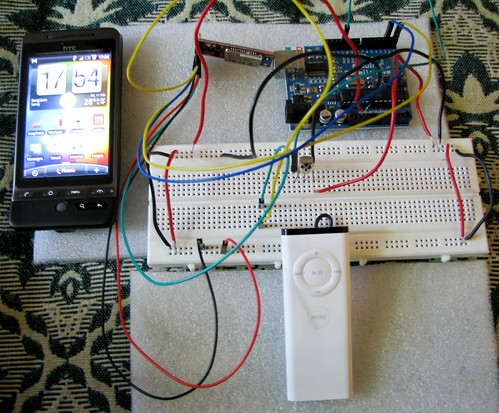
Make everything talk
Now power up your Arduino using a battery or a DC power source. The Red LED in the Bluetooth shield will blink indicating that it is ready to receive connections. Now open up your Amarino app installed in your phone and connect it to the Bluetooth shield. Once connected the Red LED will stop blinking.
Now open up the default Music player in your Android phone and start playing some music. Now try to press the volume buttons in your Apple Remote by pointing it towards the IR Receiver. The volume of the music playing in your phone should vary accordingly.
Also try pressing the next, previous and play/pause button in your Apple Remote and enjoy controlling your Android phone through your Apple Remote 🙂
PS: This tutorial is also available as an instructable.
Great project.
I am always amazed seeing what other developers create with Amarino.
Hope to see more.
Hi Sudar,
Interesting session at AndroidCamp. Thanks for the same.
Can you tell me which BlueTooth module you are using. Looks like it is from SparkFun, but I am not able to find out the model. If you have any tips about where this can be sourced in Bangalore/India, then that would be very useful too.
Thanks!
— Shree
@Shree,
Nice to know that you liked my session at AndroidCamp 🙂
I am using BlueSMiRF Gold (http://www.sparkfun.com/products/582). In India you can try to get it online from http://www.rhydolabz.com
Fantastic project. If you’re looking for an Arduino that has Bluetooth built-in, check out our Daisy: http://daisyworks.com . We’ve already built in the ability to program the device with an Android, and control it with an Android.
All you need to do is build a simple little firmware to do whatever it is you want to do, and the Android app to control it. We have an App Store that you could put it on, and let other people reach it.
We built the same thing for the desktop: Mac, Linux, Windows. You can browse an App Store – FOTA the device wirelessly, and then control it with a UI. Take a look — it might be interesting for you next project.
I was just looking for this. I have a Minix Neo android stick and an old Apple remote. But Im afraid I lack the knowledge to suceed with this project. I was hoping to find an USB IR receiver compatible with Apple remote that works on Android… Ill keep dreaming 😉